Mapping Resources: Difference between revisions
mNo edit summary |
|||
| (50 intermediate revisions by 2 users not shown) | |||
| Line 2: | Line 2: | ||
'''>>>[[Wiki_tutorial|basic editing tutorial]] | '''>>>[[Wiki_tutorial|basic editing tutorial]] | ||
[[File:11.jpg|thumb|A new phygital dimension for living lab]] | |||
== '''CO-MAPPING''' == | |||
== '''CO-MAPPING | |||
The method is based on co-design of solutions as to address territorial and landscape questions in two steps: | The method is based on co-design of solutions as to address territorial and landscape questions in two steps: | ||
| Line 63: | Line 63: | ||
What are the tasks of the facilitators? | What are the tasks of the facilitators? | ||
The facilitator must provide gmail account to host the map on Google Drive. | |||
The facilitator can lead the activities by pre-setting the thematic layer as to orient people for collecting specific data related to the questions in each layer. | The facilitator can lead the activities by pre-setting the thematic layer as to orient people for collecting specific data related to the questions in each layer. The facilitator can share the link to the map among the participants, allowing them to edit (non only as viewers). | ||
The facilitator can export the map and all the data collected in GIS platform or on a web site; it's possible to download all the data inserted in the map during the site inspection. | |||
'''What should be avoided? | '''What should be avoided? | ||
| Line 70: | Line 73: | ||
It is difficult to coordinate too many participants in the site trip-exploration walk. | It is difficult to coordinate too many participants in the site trip-exploration walk. | ||
It should be avoided to let people map without a breefing in which the facilitator explains how to insert by thematic layer data on the map. | |||
== Tutorial == | |||
<gallery widths="400" heights="250" perrow="3"> | |||
File:Step 1.png|Google My Maps: a digital place for co-mapping | |||
File:Step 2.png|Organize in advance the data’s categories to be co-mapped by setting thematic layers | |||
File:Step 3.png|Customize your map style | |||
File:Step 4.png|Data management by thematic layers | |||
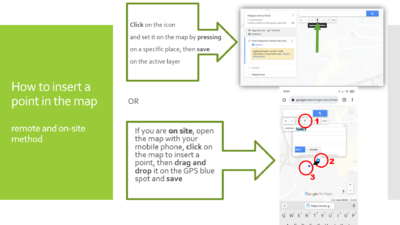
File:Step 5.png|Inserting a pin: on-site and remote method | |||
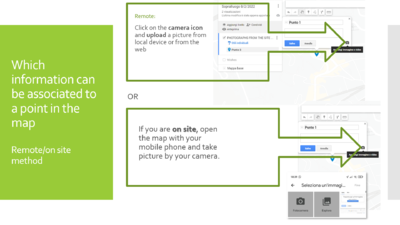
File:Step 6.png|Adding information to a pin on the map | |||
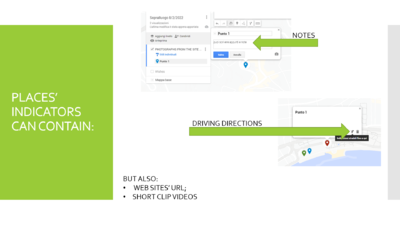
File:Step 7.png|Other information that can be added to a pin | |||
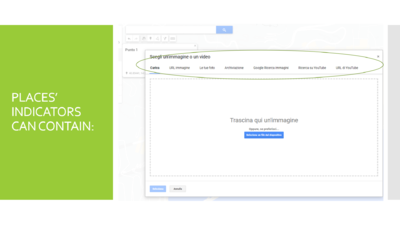
File:Step 8.png|Adding a web link to a pin | |||
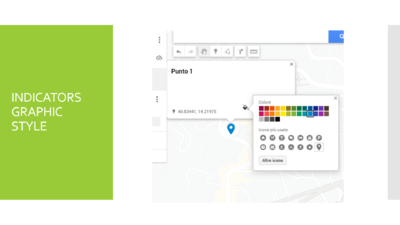
File:Step 9.png|Customizing the graphic style of each pin in order to better recognize i on the map | |||
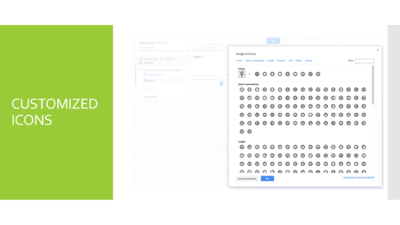
File:Step 10.png|Customized icor for pins | |||
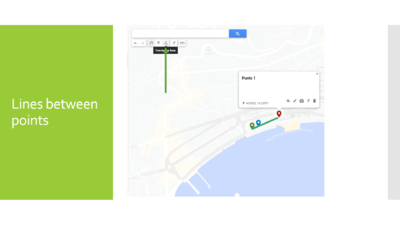
File:Step 11.png|Drawing paths between pins | |||
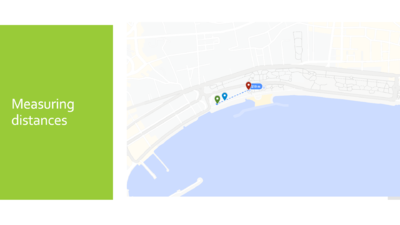
File:Step 12.png|Measuring distances directly on the map | |||
</gallery> | |||
== Examples of typical results == | == Examples of typical results == | ||
| Line 84: | Line 105: | ||
b. By selecting specific topics and analysing their capability for other living labs based on narrowed research themes, in such a way to generate a tree-scheme. | b. By selecting specific topics and analysing their capability for other living labs based on narrowed research themes, in such a way to generate a tree-scheme. | ||
c. By exporting the Google My maps into a GIS, for further development by specialized users. | |||
== Any limitations and typical pitfalls? == | == Any limitations and typical pitfalls? == | ||
Although | Although Google My Maps platform is open and free of charge, the living lab facilitator - who is in charge of preparing the map for the workshop activities - needs a Gmail account, as the map and the entered data will be hosted on the Google drive associated to the account. However, it is possible to export the map to be included in websites and GIS platforms. Such maps report the initial phase of community mapping activity and data collection, subsequently available for the transformation project. | ||
== | == Further readings, links and references == | ||
Auge, M. (2008) ‘From Places to Non-Places’, in Non-places: introduction to an anthropology of supermodernity. London: Verso. | |||
Calvino, I. (2002) Invisible cities. London: Vintage. | |||
Soon, Chien Jon and Roe, Paul and Tjondronegoro, Dian W. (2008) An approach to mobile collaborative mapping. In Proceedings Symposium on AppliedComputing, pages pp. 1929-1934, Fortaleza, Ceara, Brazil | |||
Giblett, R. J., Tolonen, J. P. and ebrary, Inc (2012) Photography and landscape. Bristol, UK: Gardners Books. | |||
Metro-Roland, M. M., Knudsen, D. C. and Greer, C. E. (2008) Landscape, Tourism, and Meaning: New Directions in Tourism Analysis. Taylor and Francis. | |||
Sepideh Shahamati, Léa Denieul-Pinsky, Yannick Baumann, Emory Shaw, Sébastien Caquard, uMap: A Free Open-Source Alternative to Google My Maps, in Cartographic Perspectives, Number 99, FORTHCOMING, DOI: 10.14714/CP99.1729 | |||
Scott, M. (2015), Space systems for disaster warming, response, and recovery. New York, NY : Springer. | |||
[[#top| Back to the Top ]]</span></div> | [[#top| Back to the Top ]]</span></div> | ||
Latest revision as of 11:11, 24 March 2023
>>>back to methods overview
CO-MAPPING
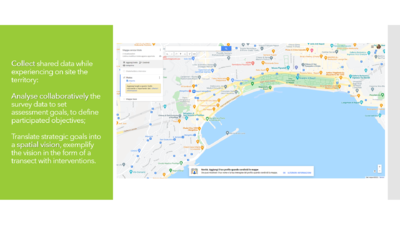
The method is based on co-design of solutions as to address territorial and landscape questions in two steps:
- walking on site and mapping main criticalities and resources on a shared platform;
- discussion with the participants and elaboration of shared solutions based on the evidence of step 1.
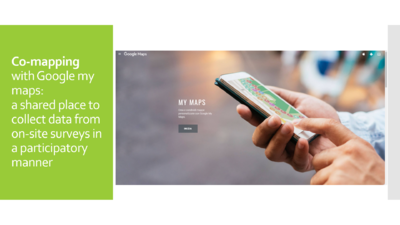
The main tool for this method is “Google my maps”, an easy-to-use platform to map various types of information, both on site with mobile phones and remotely. The aim is to geolocalise information intuitively and, at the same time, to structure it according to thematic layers. The living lab participants can share the results of their exploration walk and open a common space to elaborate planning/design solutions.
What are the goals of this method?
The shared platform is built on the descriptions of mapped resources such as photos, sketches, texts, interviews, questionnaires, etc., collected during the “exploration walk”. Therefore, it is a valuable means to discuss and elaborate solutions in a large participatory context. Moreover, the tool “Google my maps” requires only a Google account, it is free and easy to use. Non-experts can insert in map many elements, for instance photos, videos, and further sources whilst walking in the site trip, simply using their mobile phones.
• Which types of knowledge does it generate?
Residents, students, and stakeholders can develop specific skills to analyse the landscape and co-design. By walking on site, filling the map pre-set by the facilitator of the living lab activities, creating a shared platform, identifying and discussing shared problems, it is possible to delineate co-designed scenarios. The participants can share their knowledge of places, highlighting key points with the support of photos, sketches, questionnaires, interviews. The possibility to map data helps people to build a better understanding of the territory, as such information is geolocalised and spatialised.
What are typical questions this method is able to answer?
Which and where are located the main resources of the study areas?
Which are the visible problems of the study areas, according to the involved stakeholders?
Can you localise resources and key points along the walk?
Can the participants analyse and discuss the observations collected by other stakeholders of the Living Lab?
In which situations can this method be applied?
This method is suitable when the study area is not well known, and the stakeholders are not fully aware of the main issues of the places and aims of the community. A typical cas is the process of participation in a municipal masterplan which needs to address sectoral aspects related to a neighbourhood, a rural area, an open space (square, park, lake, etc.), public facilities (sports area, equipped beach, railway station area, etc.) or a path along a waterbody.
Who is typically involved?
In this method, the stakeholders’ participation is open and wide: students, academia, municipality, civil society, NGOs, touristic industry, commerce actors, farmers, facility managers, and others - depending on the chosen site.
How does this method work in practice?
This method allows students, stakeholders, residents, and municipal authorities to walk along the area and discuss the shared results together, finding co-designed solutions. The suggested phases are listed below: 1) Living Lab kick-off meeting: the stakeholders introduce themselves and illustrate their knowledge and objectives for the study area. 2) Collection of main data on the area (maps, social data, description of natural and social systems). 3) Preparation of the shared platform using “Google my maps” tool with identification of the layers of interest. 4) Setting the site walk (number and types of participants, time to be spent, devices, definition of the limits of the exploration area). 5) Site trip with exploration walk (the group and selected leaders walk and visit the study area, shooting and inserting their own photos to document their viewpoint. It represents a participatory survey of information directly linked to the places in map. Thus, it is possible to localise the viewpoint of each photo, to provide a short note to comment and express a vision, a weakness, an aim for transformation, and so on. 6) Discussion of the outcomes collected on the shared platform to highlight common problems, different viewpoints, and proposed solutions. The solutions may be further classified and categorised by defining intervention priorities. 7) Elaboration of sketches to illustrate solutions by the living lab members.
How much time is needed for each step?
1) 1-2 hours 2) 2-4 hours 3) 1 hour 4) 1 hour 5) 3-4 hours 6) 2 hours 7) 2 hours The platform does not require any previous knowledge. The first step is to be aware of the thematic requests of each layer. Subsequently, the participants can experience a “walking lab” together in the study areas and insert information in real time on the map, including thoughts, impressions, and feeling.
Which materials/rooms/technical equipment is needed?
Interviews and questionnaires are the most common methods to understand local people knowledge and collect community aims. Because the answers are strongly conditionate also by the place in which the interview is taken, the tool “Google my maps” allows to link them to the specific site where they have been taken.
What are the tasks of the facilitators? The facilitator must provide gmail account to host the map on Google Drive.
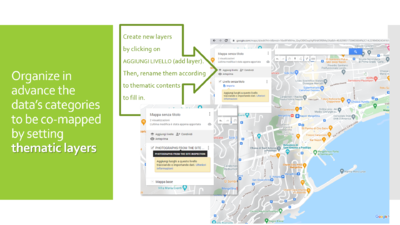
The facilitator can lead the activities by pre-setting the thematic layer as to orient people for collecting specific data related to the questions in each layer. The facilitator can share the link to the map among the participants, allowing them to edit (non only as viewers).
The facilitator can export the map and all the data collected in GIS platform or on a web site; it's possible to download all the data inserted in the map during the site inspection.
What should be avoided?
It is difficult to coordinate too many participants in the site trip-exploration walk. It should be avoided to let people map without a breefing in which the facilitator explains how to insert by thematic layer data on the map.
Tutorial
Examples of typical results
At the following link there is a typical map, with pre-set layers
What are typical next steps after applying this method?
The outcomes of the living lab can lead to further development of proposals:
a. By conceiving design proposals inspired by the final sketches of the participatory process – the design phase may involve students and professionals.
b. By selecting specific topics and analysing their capability for other living labs based on narrowed research themes, in such a way to generate a tree-scheme.
c. By exporting the Google My maps into a GIS, for further development by specialized users.
Any limitations and typical pitfalls?
Although Google My Maps platform is open and free of charge, the living lab facilitator - who is in charge of preparing the map for the workshop activities - needs a Gmail account, as the map and the entered data will be hosted on the Google drive associated to the account. However, it is possible to export the map to be included in websites and GIS platforms. Such maps report the initial phase of community mapping activity and data collection, subsequently available for the transformation project.
Further readings, links and references
Auge, M. (2008) ‘From Places to Non-Places’, in Non-places: introduction to an anthropology of supermodernity. London: Verso.
Calvino, I. (2002) Invisible cities. London: Vintage.
Soon, Chien Jon and Roe, Paul and Tjondronegoro, Dian W. (2008) An approach to mobile collaborative mapping. In Proceedings Symposium on AppliedComputing, pages pp. 1929-1934, Fortaleza, Ceara, Brazil
Giblett, R. J., Tolonen, J. P. and ebrary, Inc (2012) Photography and landscape. Bristol, UK: Gardners Books.
Metro-Roland, M. M., Knudsen, D. C. and Greer, C. E. (2008) Landscape, Tourism, and Meaning: New Directions in Tourism Analysis. Taylor and Francis.
Sepideh Shahamati, Léa Denieul-Pinsky, Yannick Baumann, Emory Shaw, Sébastien Caquard, uMap: A Free Open-Source Alternative to Google My Maps, in Cartographic Perspectives, Number 99, FORTHCOMING, DOI: 10.14714/CP99.1729
Scott, M. (2015), Space systems for disaster warming, response, and recovery. New York, NY : Springer.

